Git Branching and Merging
Why#
In a collaborative environment, it is common for several developers to share and work on the same source code. While some developers will be fixing bugs, others will be implementing new features, etc. With so much going on, there needs to be a system in place for managing different versions of the same code base.
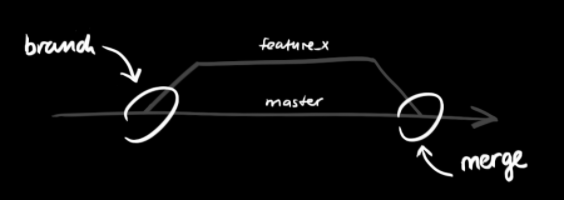
Branching allows each developer to branch out from the original code base and isolate their work from others. It also helps Git to easily merge versions later on.
What truly separates Git from other VCS is the fact it's distributed. Many of the prior VCSs like CVS and svn had branching but were centralized and couldn't be used offline.
What#
Feature Branches#
Branches are used to develop features isolated from each other.
The master branch is the default branch when you create a repository.
We'll use other branches for development and then merge those branches back to the master branch upon completion.

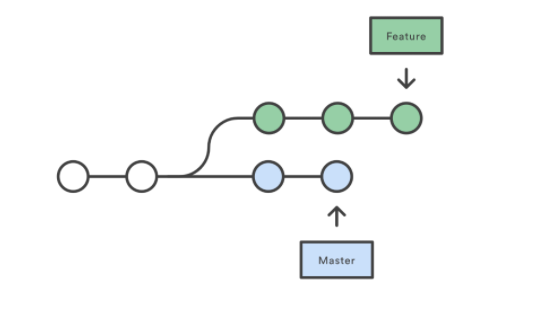
In this diagram below, we have two separate branches. Our Master Branch – which is our default branch – and our Feature branch. So we have two isolated lines of development:

By developing them in branches, it’s not only possible to work on both of them in parallel, but it also keeps the main master branch free from questionable code.
Branching Steps#
You can create a branch locally as long as you have a cloned version of the repo.
- From your terminal window, list the branches on your repository with:
This output indicates there is a single branch, the master and the asterisk indicates it is currently active.
- Create a new feature branch in the repository with:
- Switch to the feature branch to work on it with:
You can list the branches again with the git branch command.
- Commit the change to the feature branch:
- Switch back to the master branch.
- Push the feature branch to GitHub:
- And finally, view the Source page of your repository in GitHub. You should see both the master and the feature branch. When you select the feature branch, you see the Source page from that perspective. Select the feature branch to view its Recent commits.
Switching Branches#
The git checkout command allows you to switch branches by updating the files in your working tree to match the version stored in the branch that you wish to switch to.
You can think of it as a way of switching between different workspaces.
Merging Branches#
The merge command allows you to join two or more development histories together, such as a branch:
- Merges other-branch into the current branch
So if we want to merge our feature branch into our Master branch:
- Switch to our master branch
- Make sure we have the latest version of master
- Merge featureBranch into Master branch
How#
Let’s say you’ve been given the task of creating a new feature for an app. Instead of making a bunch of commits to our master branch and seeing if the new feature works or not, we can create a new branch (or development history) and see if the feature works there. If the feature doesn’t work, no harm no foul. If it does, we can eventually merge that branch into the master branch. Here we have avoided tainting our master branches timeline with mistakes.
Let's go through the process one more time.
We'll create a new branch with called bugFix:
Then we'll switch to the bugFix branch:
Once on bugFix, we'll make changes. Then we need to add our changes to the staging area and commit them.
It's time to merge bugFix into our main branch.
And that's it! We created a new branch called bugFix. We switched to our new branch, made updates, and eventually merges those bug fixes into our main branch.
Takeaways#
- Git branches are seperate snapshots of your code base that you can work on
git branchlists branchesgit branch <branch_name>creates a branchgit checkout <branch_name>switches to an existing branch